Forums
New posts
Search forums
What's new
New posts
New media
New media comments
New profile posts
Latest activity
Media
New media
New comments
Search media
Members
Current visitors
New profile posts
Search profile posts
Log in
Register
What's new
Search
Search
Search titles only
By:
New posts
Search forums
Menu
Log in
Register
Install the app
Install
Forums
General Discussion
Other Vehicles
ProSho Z71
JavaScript is disabled. For a better experience, please enable JavaScript in your browser before proceeding.
You are using an out of date browser. It may not display this or other websites correctly.
You should upgrade or use an
alternative browser
.
Reply to thread
Message
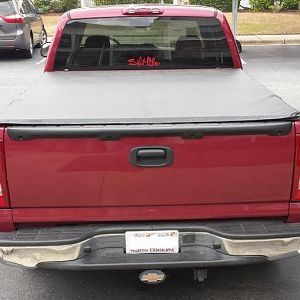
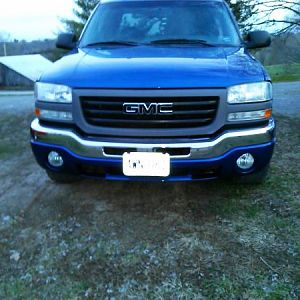
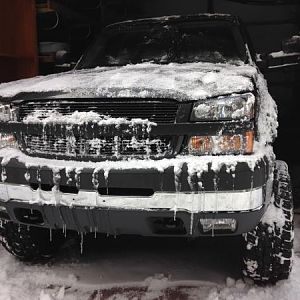
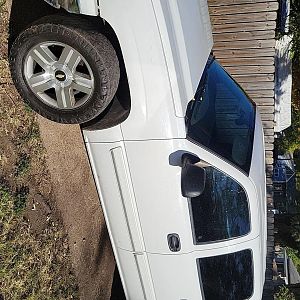
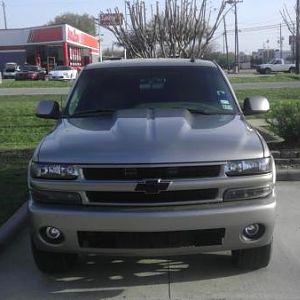
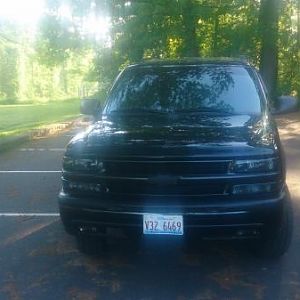
<blockquote data-quote="ProShoCustoms" data-source="post: 3349" data-attributes="member: 67"><p>I have a few updates since the last one! Let's get started</p><p></p><p>Well guys. I finally took some suggestions and pulled off my window visors. Don't miss em either. The truck looks really clean without them. </p><p></p><p><img src="http://img.tapatalk.com/d/14/07/02/2y8usynu.jpg" alt="" class="fr-fic fr-dii fr-draggable " style="" /></p><p></p><p><img src="http://img.tapatalk.com/d/14/07/02/7u6ysa7a.jpg" alt="" class="fr-fic fr-dii fr-draggable " style="" /></p><p></p><p>That's a small visual update, next is slightly larger. I haven't went over my bumper project at all with you guys, so let's start from the beginning!</p><p></p><p>I have been wanting to put a smoothie diesel style bumper on my truck for a while now, and paint it white. For those of you who don't know what the diesel style is, it is the OEM bumper with two OEM intake holes, such as this one</p><p></p><p><img src="http://i1.ytimg.com/vi/4CG0SWtWlPc/hqdefault.jpg" alt="" class="fr-fic fr-dii fr-draggable " style="" /></p><p></p><p>I've played with the idea of building an "off road" style bumper, or getting a Road Armor or Iron Cross bumper for it, but I really wanted to stay close to OEM and stock with the nice, clean look. I found a bumper off of a 2000-2002 Tahoe Z71 on Craigslist, got a really good deal on it and went and got it. Here's a Tahoe Z71 for reference. They came with this bumper, fog lights, and a brush guard.</p><p></p><p><img src="http://img2.netcarshow.com/Chevrolet-Tahoe_2000_1024x768_wallpaper_03.jpg" alt="" class="fr-fic fr-dii fr-draggable " style="" /></p><p></p><p>The owner totaled his, so he was parting out. He had everything else sold. It was about an hour drive, but worth it. The bumper I got my hands on was tan. I have wanted to add a light bar to my truck in a subtle way, my idea was integrating it into the bumper, so my Dad and I decided to make it happen. He helped me a lot with this project because he has the welding and fabricating skills that I don't. We started out with taping off the hole that was to be cut for my 6" Black Box LED light bar.</p><p></p><p><a href="https://flic.kr/p/nJBfhJ" target="_blank"><img src="https://farm4.staticflickr.com/3811/14265661946_572aa38922_b.jpg" alt="" class="fr-fic fr-dii fr-draggable " style="" /></a><a href="https://flic.kr/p/nJBfhJ" target="_blank">20140527_174239</a> by <a href="https://www.flickr.com/people//" target="_blank">officertyler</a>, on Flickr</p><p></p><p>Cut the hole out</p><p></p><p><a href="https://flic.kr/p/nu9YZi" target="_blank"><img src="https://farm6.staticflickr.com/5154/14102106619_87d16cb107_b.jpg" alt="" class="fr-fic fr-dii fr-draggable " style="" /></a><a href="https://flic.kr/p/nu9YZi" target="_blank">20140527_190435</a> by <a href="https://www.flickr.com/people//" target="_blank">officertyler</a>, on Flickr</p><p></p><p>Next there was 8 small holes that needed to be gone, 4 for the brush guard, and 4 for the license plate holder, which I am getting rid of. We welded them up and smoothed them over. Also test fit the light bar.</p><p></p><p><a href="https://flic.kr/p/ohUWK9" target="_blank"><img src="https://farm4.staticflickr.com/3870/14631242814_68a46f7b46_b.jpg" alt="" class="fr-fic fr-dii fr-draggable " style="" /></a><a href="https://flic.kr/p/ohUWK9" target="_blank">20140710_234029</a> by <a href="https://www.flickr.com/people//" target="_blank">officertyler</a>, on Flickr</p><p></p><p><a href="https://flic.kr/p/o1Bqix" target="_blank"><img src="https://farm4.staticflickr.com/3846/14446759569_8af14143a0_b.jpg" alt="" class="fr-fic fr-dii fr-draggable " style="" /></a><a href="https://flic.kr/p/o1Bqix" target="_blank">20140710_234024</a> by <a href="https://www.flickr.com/people//" target="_blank">officertyler</a>, on Flickr</p><p></p><p>Next was the debate on whether or not I was powder coating or painting it. I decided painting was going to be the cheaper route, and we can do that at home. I bought a mix of olympic/summit white, after talking with GM about how the paint codes were apparently the same for '97, and making sure I was getting the right color. Primed, painted, and cleared.</p><p></p><p><a href="https://flic.kr/p/o8PgKe" target="_blank"><img src="https://farm6.staticflickr.com/5570/14528287599_00fb37972f_b.jpg" alt="" class="fr-fic fr-dii fr-draggable " style="" /></a><a href="https://flic.kr/p/o8PgKe" target="_blank">20140714_210706</a> by <a href="https://www.flickr.com/people//" target="_blank">officertyler</a>, on Flickr</p><p></p><p>Got it all ready to mount onto the truck</p><p></p><p><a href="https://flic.kr/p/oq6Fqh" target="_blank"><img src="https://farm4.staticflickr.com/3925/14712552964_1c97000c10_b.jpg" alt="" class="fr-fic fr-dii fr-draggable " style="" /></a><a href="https://flic.kr/p/oq6Fqh" target="_blank">20140720_174729</a> by <a href="https://www.flickr.com/people//" target="_blank">officertyler</a>, on Flickr</p><p></p><p><a href="https://flic.kr/p/oqiSUr" target="_blank"><img src="https://farm3.staticflickr.com/2916/14714932945_e9ff37e182_b.jpg" alt="" class="fr-fic fr-dii fr-draggable " style="" /></a><a href="https://flic.kr/p/oqiSUr" target="_blank">20140720_163018</a> by <a href="https://www.flickr.com/people//" target="_blank">officertyler</a>, on Flickr</p><p></p><p><a href="https://flic.kr/p/oqiSh4" target="_blank"><img src="https://farm3.staticflickr.com/2912/14714930835_034287b116_b.jpg" alt="" class="fr-fic fr-dii fr-draggable " style="" /></a><a href="https://flic.kr/p/oqiSh4" target="_blank">20140720_184444</a> by <a href="https://www.flickr.com/people//" target="_blank">officertyler</a>, on Flickr</p><p></p><p>And there we go. Brand new look!!</p><p></p><p><a href="https://flic.kr/p/o8QjC4" target="_blank"><img src="https://farm4.staticflickr.com/3910/14528492387_5269123a10_b.jpg" alt="" class="fr-fic fr-dii fr-draggable " style="" /></a><a href="https://flic.kr/p/o8QjC4" target="_blank">20140720_203031</a> by <a href="https://www.flickr.com/people//" target="_blank">officertyler</a>, on Flickr</p><p></p><p><a href="https://flic.kr/p/os4Fh2" target="_blank"><img src="https://farm4.staticflickr.com/3874/14734795253_590e810e34_b.jpg" alt="" class="fr-fic fr-dii fr-draggable " style="" /></a><a href="https://flic.kr/p/os4Fh2" target="_blank">20140720_203208</a> by <a href="https://www.flickr.com/people//" target="_blank">officertyler</a>, on Flickr</p><p></p><p>This is one of my favorite things I have done to this truck! I am planning on adding more lights to those intake holes as well. Here are some YouTube videos to go along with the photos.</p><p></p><p><a href="https://www.youtube.com/watch?v=4YPFhgPZTiY&list=UU2XJbSbRFm-55XG8iLBXURQ" target="_blank">https://www.youtube.com/watch?v=4YPFhgPZTiY&list=UU2XJbSbRFm-55XG8iLBXURQ</a></p><p></p><p><a href="https://www.youtube.com/watch?v=_FhISQjGxqA&list=UU2XJbSbRFm-55XG8iLBXURQ" target="_blank">https://www.youtube.com/watch?v=_FhISQjGxqA&list=UU2XJbSbRFm-55XG8iLBXURQ</a></p><p></p><p><a href="https://www.youtube.com/watch?v=3k3w_T7z86E&list=UU2XJbSbRFm-55XG8iLBXURQ" target="_blank">https://www.youtube.com/watch?v=3k3w_T7z86E&list=UU2XJbSbRFm-55XG8iLBXURQ</a></p></blockquote><p></p>
[QUOTE="ProShoCustoms, post: 3349, member: 67"] I have a few updates since the last one! Let's get started Well guys. I finally took some suggestions and pulled off my window visors. Don't miss em either. The truck looks really clean without them. [IMG]http://img.tapatalk.com/d/14/07/02/2y8usynu.jpg[/IMG] [IMG]http://img.tapatalk.com/d/14/07/02/7u6ysa7a.jpg[/IMG] That's a small visual update, next is slightly larger. I haven't went over my bumper project at all with you guys, so let's start from the beginning! I have been wanting to put a smoothie diesel style bumper on my truck for a while now, and paint it white. For those of you who don't know what the diesel style is, it is the OEM bumper with two OEM intake holes, such as this one [img]http://i1.ytimg.com/vi/4CG0SWtWlPc/hqdefault.jpg[/img] I've played with the idea of building an "off road" style bumper, or getting a Road Armor or Iron Cross bumper for it, but I really wanted to stay close to OEM and stock with the nice, clean look. I found a bumper off of a 2000-2002 Tahoe Z71 on Craigslist, got a really good deal on it and went and got it. Here's a Tahoe Z71 for reference. They came with this bumper, fog lights, and a brush guard. [img]http://img2.netcarshow.com/Chevrolet-Tahoe_2000_1024x768_wallpaper_03.jpg[/img] The owner totaled his, so he was parting out. He had everything else sold. It was about an hour drive, but worth it. The bumper I got my hands on was tan. I have wanted to add a light bar to my truck in a subtle way, my idea was integrating it into the bumper, so my Dad and I decided to make it happen. He helped me a lot with this project because he has the welding and fabricating skills that I don't. We started out with taping off the hole that was to be cut for my 6" Black Box LED light bar. [url=https://flic.kr/p/nJBfhJ][img]https://farm4.staticflickr.com/3811/14265661946_572aa38922_b.jpg[/img][/url][url=https://flic.kr/p/nJBfhJ]20140527_174239[/url] by [url=https://www.flickr.com/people//]officertyler[/url], on Flickr Cut the hole out [url=https://flic.kr/p/nu9YZi][img]https://farm6.staticflickr.com/5154/14102106619_87d16cb107_b.jpg[/img][/url][url=https://flic.kr/p/nu9YZi]20140527_190435[/url] by [url=https://www.flickr.com/people//]officertyler[/url], on Flickr Next there was 8 small holes that needed to be gone, 4 for the brush guard, and 4 for the license plate holder, which I am getting rid of. We welded them up and smoothed them over. Also test fit the light bar. [url=https://flic.kr/p/ohUWK9][img]https://farm4.staticflickr.com/3870/14631242814_68a46f7b46_b.jpg[/img][/url][url=https://flic.kr/p/ohUWK9]20140710_234029[/url] by [url=https://www.flickr.com/people//]officertyler[/url], on Flickr [url=https://flic.kr/p/o1Bqix][img]https://farm4.staticflickr.com/3846/14446759569_8af14143a0_b.jpg[/img][/url][url=https://flic.kr/p/o1Bqix]20140710_234024[/url] by [url=https://www.flickr.com/people//]officertyler[/url], on Flickr Next was the debate on whether or not I was powder coating or painting it. I decided painting was going to be the cheaper route, and we can do that at home. I bought a mix of olympic/summit white, after talking with GM about how the paint codes were apparently the same for '97, and making sure I was getting the right color. Primed, painted, and cleared. [url=https://flic.kr/p/o8PgKe][img]https://farm6.staticflickr.com/5570/14528287599_00fb37972f_b.jpg[/img][/url][url=https://flic.kr/p/o8PgKe]20140714_210706[/url] by [url=https://www.flickr.com/people//]officertyler[/url], on Flickr Got it all ready to mount onto the truck [url=https://flic.kr/p/oq6Fqh][img]https://farm4.staticflickr.com/3925/14712552964_1c97000c10_b.jpg[/img][/url][url=https://flic.kr/p/oq6Fqh]20140720_174729[/url] by [url=https://www.flickr.com/people//]officertyler[/url], on Flickr [url=https://flic.kr/p/oqiSUr][img]https://farm3.staticflickr.com/2916/14714932945_e9ff37e182_b.jpg[/img][/url][url=https://flic.kr/p/oqiSUr]20140720_163018[/url] by [url=https://www.flickr.com/people//]officertyler[/url], on Flickr [url=https://flic.kr/p/oqiSh4][img]https://farm3.staticflickr.com/2912/14714930835_034287b116_b.jpg[/img][/url][url=https://flic.kr/p/oqiSh4]20140720_184444[/url] by [url=https://www.flickr.com/people//]officertyler[/url], on Flickr And there we go. Brand new look!! [url=https://flic.kr/p/o8QjC4][img]https://farm4.staticflickr.com/3910/14528492387_5269123a10_b.jpg[/img][/url][url=https://flic.kr/p/o8QjC4]20140720_203031[/url] by [url=https://www.flickr.com/people//]officertyler[/url], on Flickr [url=https://flic.kr/p/os4Fh2][img]https://farm4.staticflickr.com/3874/14734795253_590e810e34_b.jpg[/img][/url][url=https://flic.kr/p/os4Fh2]20140720_203208[/url] by [url=https://www.flickr.com/people//]officertyler[/url], on Flickr This is one of my favorite things I have done to this truck! I am planning on adding more lights to those intake holes as well. Here are some YouTube videos to go along with the photos. [url]https://www.youtube.com/watch?v=4YPFhgPZTiY&list=UU2XJbSbRFm-55XG8iLBXURQ[/url] [url]https://www.youtube.com/watch?v=_FhISQjGxqA&list=UU2XJbSbRFm-55XG8iLBXURQ[/url] [url]https://www.youtube.com/watch?v=3k3w_T7z86E&list=UU2XJbSbRFm-55XG8iLBXURQ[/url] [/QUOTE]
Verification
Post reply
Random media
Latest posts
Rust free state options
Latest: FW_Z71Burb
Today at 1:40 PM
Ebay / Craigslist Finds
GMT800 diagnostic and control app
Latest: AuroraGirl
Yesterday at 5:31 PM
Tech Discussion
Suburban rear window
Latest: ORVietVet
Wednesday at 9:35 PM
Exterior
Manual seat to Electic
Latest: AuroraGirl
Wednesday at 7:38 PM
Interior
M
Gear ratio
Latest: Marky Dissod
Wednesday at 12:00 PM
Engine & Performance
Members online
No members online now.
Forums
General Discussion
Other Vehicles
ProSho Z71
Top