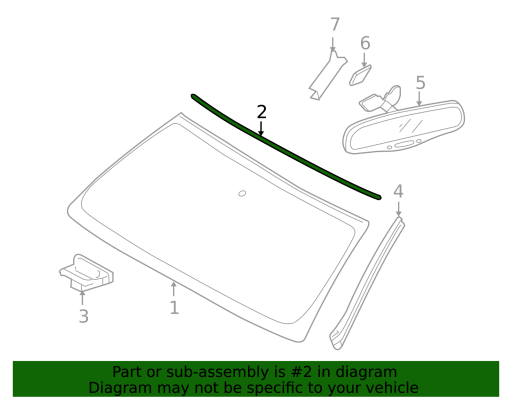
Upper windshield trim is loose

SK101

Well-Known Member
Joined
Jul 21, 2025
Messages
63
Reaction score
163
Location
Sask
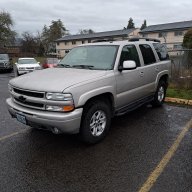
The black trim above the windshield occasionally comes loose on the passengers side. But not at the end, that stays connected and the trim forms a bow between the center and the end. I push it back and it seems to fit and stays in place for a few weeks.
What is supposed to hold it in place? Maybe im missing clips or something?
 

ORVietVet

Well-Known Member
Navy Supporting Member
Joined
Dec 31, 2023
Messages
2,773
Reaction score
5,085
Location
Oregon
The black trim above the windshield occasionally comes loose on the passengers side. But not at the end, that stays connected and the trim forms a bow between the center and the end. I push it back and it seems to fit and stays in place for a few weeks.
What is supposed to hold it in place? Maybe im missing clips or something?

When it is pulled away/loose and you can safely pull it to make a little room, clean thoroughly with alcohol and use some water sealer, very thin film, and push back in place. Do this when you can push in place and let sit for a couple days in a dry place.

Or, ask a glass business the best thing to do.
 

AuroraGirl

Well-Known Member
Joined
Dec 24, 2023
Messages
455
Reaction score
887
Location
Wisconsin
The black trim above the windshield occasionally comes loose on the passengers side. But not at the end, that stays connected and the trim forms a bow between the center and the end. I push it back and it seems to fit and stays in place for a few weeks.
What is supposed to hold it in place? Maybe im missing clips or something?

what year?1786529987144.png
It is possible to address this issue without replacing the entire windshield glass by applying a thin bead of urethane in the channel of a new lace molding (P/N 88980304) and then roll it onto the windshield.

If you want 3 new windshield trim pieces ,


[H3]Condition[/H3]

Some customers may comment on noise coming from the windshield and door area.

[H3]Cause[/H3]

This condition may be caused by the installation of a hood air deflector. The deflector may change the path of the air across the vehicle, causing the left side and right side windshield reveal molding to make noise.

[H3]Correction[/H3]

Replace the left and right side windshield reveal molding. Refer to the Windshield Side Reveal Molding Replacement procedure in SI.

[H3]Parts Information[/H3]

Part Number​
Description​
15131200​
Reveal Molding​
15131201​
Reveal Molding​


-------------

The fix in the first thing I posted can probably be done in your current molding if you dont want to buy s new one by just cleaning out the channel if it has old urethane and then reapplying
 

AuroraGirl

Well-Known Member
Joined
Dec 24, 2023
Messages
455
Reaction score
887
Location
Wisconsin
[H4]Tools Required[/H4]
Urethane Adhesive Kit GM P/N 12346392 or Equivalent
Isopropyl Alcohol or Equivalent
Cartridge-type Caulking Gun
Plastic Paddle
[H3]Removal Procedure[/H3]
  1. Remove both right and left sides of the reveal molding. Refer to Windshield Side Reveal Molding Replacement .
  2. Object Number: 301108  Size: SH

    Caution: When working with any type of glass or sheet metal with exposed or rough edges, wear approved safety glasses and gloves in order to reduce the chance of personal injury.
    Important: The windshield reveal molding fills the cavities between the body and windshield. If the reveal molding is stretched or damaged it and cannot be reused it must be replaced.
  3. Remove the upper windshield reveal molding.
  4. 2.1. Use a flat-bladed tool in order to carefully pry the end of the upper reveal molding out about 76 mm (3 in).
    2.2. Grasp the corner of the windshield reveal molding by hand or use a suitable tool to slowly pull the reveal molding away from the windshield.
    2.3. If the windshield reveal molding will not release, use a utility knife to aid in the releasing of the molding.
[H3]Installation Procedure[/H3]
  1. Clean the top edge of the windshield surface with a 50/50 mixture of isopropyl alcohol and water by volume on a dampened lint - free cloth.
  2. The new reveal molding should be fitted to the windshield prior to installation.
  3. Caution: When replacing stationary windows, use Urethane Adhesive Kit GM P/N 12346392 (Canadian P/N 10952983), or a urethane adhesive system meeting GM Specification GM3651G, to maintain original installation integrity. Failure to use the urethane adhesive kit will result in poor retention of the window which may allow unrestrained occupants to be ejected from the vehicle resulting in personal injury.
  4. Verify all primers and urethane adhesive are within expiration dates.
  5. Object Number: 739026  Size: SH

    Important: Use care when applying the prep (clear #1) to the windshield. This primer dries almost instantly, and may stain the viewing area of the windshield if not applied evenly.
  6. Use a new dauber in order to apply glass prep (clear #1) to the channel area approximately 13 mm (1/2 in) to the upper edge of the windshield.
  7. Wipe the glass primed area immediately with a clean lint-free cloth.
  8. Shake the glass primer (black #2) for at least one minute.
  9. Using a new dauber in order to apply glass primer (black #2) to the top edge of the windshield.
    Object Number: 245294  Size: SH
  10. Apply a small bead of urethane adhesive (2) between the windshield (1) and the pinchweld.
  11. Object Number: 301108  Size: SH
  12. Install the upper reveal molding.
  13. 8.1. Start from the center and hand-press the reveal molding into place over the edge of the windshield.
    8.2. Install both right and left sides of the reveal molding. Refer to Windshield Side Reveal Molding Replacement .
    8.3. Run warm water over the reveal molding in order to speed the setup time of the urethane adhesive.
    Tape should be applied in order to retain the reveal molding to the windshield, this will maintain a flush fit with the body.
    The tape is to be removed after 6 hou

because it says to remove the side moldings First here is the side moldings :
[H3]Removal Procedure[/H3]

  1. Object Number: 441415  Size: SH
  2. Pull back the front door sealing weatherstrip (1) to expose the windshield reveal molding screws.
  3. Object Number: 301107  Size: SH
  4. Remove the screws from the windshield reveal molding.
  5. Remove the windshield reveal molding from the windshield pillar.
[H3]Installation Procedure[/H3]

  1. Install the windshield reveal molding to the windshield pillar.
  2. Notice: Use the correct fastener in the correct location. Replacement fasteners must be the correct part number for that application. Fasteners requiring replacement or fasteners requiring the use of thread locking compound or sealant are identified in the service procedure. Do not use paints, lubricants, or corrosion inhibitors on fasteners or fastener joint surfaces unless specified. These coatings affect fastener torque and joint clamping force and may damage the fastener. Use the correct tightening sequence and specifications when installing fasteners in order to avoid damage to parts and systems.
    Object Number: 301107  Size: SH
  3. Install the screws to the windshield reveal molding.
  4. Tighten
    Tighten the screws to the windshield reveal molding to 2 N·m (18 lb in).
    Object Number: 441415  Size: SH
  5. Install the front door sealing weatherstrip (1) to the pinch-weld.
  6. Close the door.
 

Latest posts

Staff online

Members online

Top