Work out of my garage/driveway

ORVietVet

Well-Known Member
Navy Supporting Member
Joined
Dec 31, 2023
Messages
2,645
Reaction score
4,842
Location
Oregon
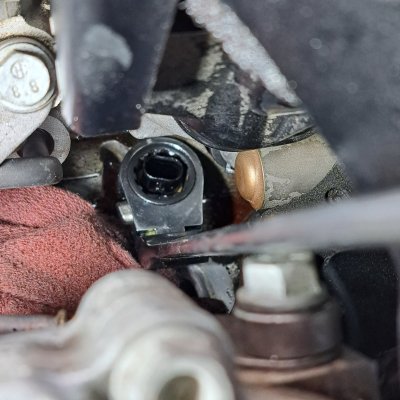
Ok, this morning got to work on a relatively easy, for me, older 1977 square body K10 4x4 manual transmission with a 5.7 Quadrajet carb. I had talked him thru his DIY timing chain replacement. His new exhaust. His carb rebuild and new choke thermostat install and choke pull off. New master cylinder and calipers and pads and shoes and w/cylinders and all new lines and hoses. Then it came time, today, to get the choke set up and check/set timing and adjust the air/fuel mixture. First thing I saw was that the exterior cap of the choke thermostat was off kilter and not snapped down square and that the rod to the cark linkage was rubbing the edge of the cap hole that it came out of and did not have free movement. I removed and reset the cap so the linkage rod had free movement and then proceeded to let the very tiny, about 1/4" across, cir clip fly away as I was trying to attach the rod to the carb linkage. I opened up some of my treasure trove of cir clips and found a bevy of 4 of the same clip and got it all installed. Verified free movement and as I expected, at a cold start, the choke idle adjustment was too low so I shut off and adjusted to a "hold your tongue just right" setting. Did the cold start again and had my vacuum gauge attached. The cold start idle was almost perfect and I adjusted as needed and the pull off worked as should and the temp gun and thermal imager told me the choke thermostat was getting hot and that the port on the intake was likely not clogged. Choke kicked off as should and I moved on to warmed up adjustments. Started with 18" of vacuum and I wanted more. I do not use a timing light. I use the vacuum gauge to set timing. I got up to about 19.5" of vacuum and snugged down the set bolt and then adjusted the air/fuel mixture screws and got just a hair over 20" of vacuum. I can live with that. I had a nicely hot engine and the choke plate was standing straight up. I shut off 3-4 times and did a "no foot on gas pedal" restart and it fired up each time very quickly. I then let sit for 4 hours and the choke set as should and the fast idle was where I liked it and it warmed and idled smooth. Again did the shut off and restart and performed flawlessly. Then I put the young "fireman" owner in it and he was gone for 30 minutes and when he came back, he told me that he went by the firehouse on purpose because of a hill he climbs to get there and the truck would cough and cut out and now pulls the hill smooth and strong with no problems. In the pics, look at the choke off kilter cap and the rod rubbing the cap opening edge. Also, check out that cir clip. Tiny little s*h*i*t!

20260318_133259.jpg20260318_133311.jpg20260318_134952.jpg20260318_140033.jpg20260318_141909.jpg20260318_141918.jpg20260318_113739.jpg20260318_113407.jpg
 
Last edited:

ORVietVet

Well-Known Member
Navy Supporting Member
Joined
Dec 31, 2023
Messages
2,645
Reaction score
4,842
Location
Oregon
Recently I was working on a 2010 F150 5.4 with a fluttering oil pressure needle on my mechanical gauge from my tool box. I wanted to see what it would say/do while driving. I went to my local O'Reilly's and they did not have extended lines to attach and read the oil pressure, in the cab while driving. They suggested to see a local, right down the street, supplier of all different kinds of sizes and lengths of lines and pressures that the lines would handle. Plus they had whatever fittings I needed and they built me 2 custom length, 8', lines with the correct fittings, for the oil pressure and fuel pressure. My cost, out the door was close to $60 total. The extended line gave me plenty of length for the oil pressure diagnostics and I know the fuel line will work too.

Since I do work out of my driveway, these 2 lines will save me so much time and guesswork. I can also get the scanner out and do it, but I wanted to SEE the fluttering needle.
 

stutaeng

Well-Known Member
Joined
Feb 9, 2022
Messages
858
Reaction score
2,258
Location
Dallas, TX
Recently I was working on a 2010 F150 5.4 with a fluttering oil pressure needle on my mechanical gauge from my tool box. I wanted to see what it would say/do while driving. I went to my local O'Reilly's and they did not have extended lines to attach and read the oil pressure, in the cab while driving. They suggested to see a local, right down the street, supplier of all different kinds of sizes and lengths of lines and pressures that the lines would handle. Plus they had whatever fittings I needed and they built me 2 custom length, 8', lines with the correct fittings, for the oil pressure and fuel pressure. My cost, out the door was close to $60 total. The extended line gave me plenty of length for the oil pressure diagnostics and I know the fuel line will work too.

Since I do work out of my driveway, these 2 lines will save me so much time and guesswork. I can also get the scanner out and do it, but I wanted to SEE the fluttering needle.
Oh, cool!

What does fluttering on the oil pressure mean? I remember looking that up once, and all recall was that it was a bad sign, but can't remember why?
 

ORVietVet

Well-Known Member
Navy Supporting Member
Joined
Dec 31, 2023
Messages
2,645
Reaction score
4,842
Location
Oregon
Oh, cool!

What does fluttering on the oil pressure mean? I remember looking that up once, and all recall was that it was a bad sign, but can't remember why?
Turns out that on this engine, I found two contributing factors when I removed the oil pan. First thing I noticed was plastic/teflon pieces trapped in the pickup tube screen. Then I saw that one of the guides, driver's side chain, had come apart, where the pieces came from, but also the chain was flopping coming off the crank gear and the crank gear also drives the oil pump and that contributed to the oil pressure needle fluctuation. The pressure was good but the fluctuation was causing problems with the VVT solenoids and setting a correlation code, that I was chasing. It's all fixed now and running fine.
 

stutaeng

Well-Known Member
Joined
Feb 9, 2022
Messages
858
Reaction score
2,258
Location
Dallas, TX
Turns out that on this engine, I found two contributing factors when I removed the oil pan. First thing I noticed was plastic/teflon pieces trapped in the pickup tube screen. Then I saw that one of the guides, driver's side chain, had come apart, where the pieces came from, but also the chain was flopping coming off the crank gear and the crank gear also drives the oil pump and that contributed to the oil pressure needle fluctuation. The pressure was good but the fluctuation was causing problems with the VVT solenoids and setting a correlation code, that I was chasing. It's all fixed now and running fine.
Oh, wow!

I'm glad you figured it out and it's fixed!
 

ORVietVet

Well-Known Member
Navy Supporting Member
Joined
Dec 31, 2023
Messages
2,645
Reaction score
4,842
Location
Oregon
It got deeper than I like to do in my driveway BUT it is a 2wd and dropping the oil pan was very easy and it was all very obvious once I could see it. The weird thing was.....I used my mechanic's stethoscope at both valve covers at the top and at the timing cover and at the bottom. No odd noises. Nothing.

I even had the valve covers off and the chains were tight at the top. The dropped oil pan showed it all.
 

ORVietVet

Well-Known Member
Navy Supporting Member
Joined
Dec 31, 2023
Messages
2,645
Reaction score
4,842
Location
Oregon
So, tackled a 2020 Colorado with 26,500 miles and the 3.6 V6 engine. Recently had a 2018 Suburban, landlords, doing the same thing as this Colorado. Temp gauge stuck at 160 degrees, CEL codes P0118 and P0128, having to do with the thermostat and the Coolant Temp Sensor. The cooling fans were staying on for 10 minutes after shut engine off, too.
They did not want to pay for the upper intake labor, for CTS access, so I was just gonna do the thermostat and cross fingers. When you look at you tube, most say the upper intake does have to come off for the CTS. One guy even made a special tool and wants $90/shipped for it. I looked at the videos and came up with an idea. I used a 15mm 12 point ICON long beam tool that has more than a 90 degree flex at the end and is a combo 15mm and 13mm and about 20" long.
Just to let you know, the CTS is tilted slightly toward the valve cover/away from center. I removed the thermostat housing/thermostat combo, that is a feat all of it's own because the 2 10mm bolt heads are hidden a bit but a 1/4" wobble extension worked for me. Do not leave the attaching bolts in there. I removed with mechanical fingers. Snaked the housing out thru the front hole and that is a bit tricky too.
Broke the CTS loose and then the fun starts. There is no "throw room" so I kept ratcheting it but had to reach in with my middle finger, no room for any more than one finger when tool is on the CTS. I had to ratchet loose and ratchet tighten and then hold pressure with the one finger to grab a couple teeth for removal and install. Basically have to have eyes in your fingers. Got it all back together, filled with coolant.
Did an oil and filter change. Cabin Air Filter and engine air filter and cleaned the MAF sensor. Reset oil change reminder and put a w/s sticker on it. Inspected the throttle body and was ok for now. Cleared codes and took on a long road test and topped off the coolant when returned.
By the way, first I drained coolant at radiator so when I released the upper hose housing, I would not have coolant all over the belt. I refilled system with fresh 50/50 Dexcool mix. After all that prep for coolant flow, I still had some come out of a small coolant pipe when I pulled the small hose, in the pics, for access.

The thermostat and CTS took close to 2 hours time. Complete time going in and back out and running.

20260404_115959.jpg20260404_120007.jpg20260404_120411.jpg20260404_120421.jpg20260404_122058.jpg20260404_122111.jpg20260404_122720.jpg20260404_122731.jpg
 

ORVietVet

Well-Known Member
Navy Supporting Member
Joined
Dec 31, 2023
Messages
2,645
Reaction score
4,842
Location
Oregon
20260404_125837.jpg20260404_130413.jpg20260404_125857.jpg20260404_125904.jpg
20260404_130147-jpg.5768
20260404_131242.jpg20260404_143549.jpg20260404_131300.jpg
 

Attachments

  • 20260404_130147.jpg
    20260404_130147.jpg
    420.1 KB · Views: 25

ORVietVet

Well-Known Member
Navy Supporting Member
Joined
Dec 31, 2023
Messages
2,645
Reaction score
4,842
Location
Oregon
Ok, so today, I worked on my landlord's son's 2004 K2500HD 6.0 crew cab, with 126k miles on it. It is in fantastic shape and I know that for sure because I used to own it about 9 months ago.

In today for an oil change. Air filter was in great shape and found that the throttle body was filthy because in the short time I owned it. 3 to 4 months, me and my girl only put 200 miles on it. I cleaned the MAF and removed the throttle body and thoroughly cleaned both sides of the plate and the plate itself. It was filthy. PITA dealing with the 2 coolant lines that attach at the bottom with some PITA clamps. Especially PITA was the one behind the alternator. Used these pliers to handle it. I used a set that had a 45 degree bend at the jaws.

1775705954607.png

But what was the biggest surprise is that even though the parts listing listed an inline fuel filter, there was none. Absolutely no inline fuel filter. Manufactured 05/04. The fuel filter was on the fuel pump. I have a 2005 Tahoe Z71 and know I don't have an inline fuel filter but was surprised that this 2004 K2500HD did not.
 

ORVietVet

Well-Known Member
Navy Supporting Member
Joined
Dec 31, 2023
Messages
2,645
Reaction score
4,842
Location
Oregon
It is still bugging me. No exterior/along the frame, fuel filter on that 2004 K2500HD, crew cab 6.0? Does anyone know if I just missed it? Know of an RPO code that proves it?
 

ORVietVet

Well-Known Member
Navy Supporting Member
Joined
Dec 31, 2023
Messages
2,645
Reaction score
4,842
Location
Oregon

I am going to be replacing the thermostat and ECT sensor on my landlord's sister's 2018 Camry XLE 2.5 hybrid, on Monday or Tuesday. Problem is related to a CEL code of P0128.

The "Maintenance Mode" that I need to put the vehicle in, for the proper refill, is talked about at 9:30 of this video. The video is made by "Car Care Nut" who is a Toyota specialist and my go to guy for anything Toyota that I am unaware of. He really does know his stuff. But I have never heard of or had to deal with this Maintenance Mode. Any of you aware of this? I am not dealing with the separate coolant/cooling system for the hybrid battery. The whole video is very informative but the Maintenance Mode is new to me.

Any thoughts and comments are appreciated.
 

stutaeng

Well-Known Member
Joined
Feb 9, 2022
Messages
858
Reaction score
2,258
Location
Dallas, TX
My vehicles are too old for that. Our newest vehicle is the 2020 Express van but that one is really old school and doesn't seem to have much complexities.

I did watch Royalty Auto Service (I think that's the YT channel?) and they guy was talking about most newer vehicles have different things to do to put it into "Service Mode" so you can replace the brake pads. I think he said it has to do with electric parking brakes. Then you have redo the procedure to exit the service mode. And each manufacturer does things differently.

Maybe maintenance mode is Toyota's name for service mode?

I used to watch that guy, until he regurgitated the old wives' tale about not changing old ATF because that can cause slipping due to the "grit"...SMH

But he's legit and to be honest, I don't think most mechanics/technicians are rebuilding transmissions or such. Eric at SMA a looong time ago showed how to rebuild a GM transfer case, that's about it. Most everyone does R&R I would gather?

Anyways, sorry for rambling and curious how that maintenance mode is performed...
You got this!
 

ORVietVet

Well-Known Member
Navy Supporting Member
Joined
Dec 31, 2023
Messages
2,645
Reaction score
4,842
Location
Oregon
Yea, service mode is to allow the rear brake work for the ones with the electronic brake switch. Then reset after brake service.

Maintenance Mode, on Toyota hybrids is for the coolant refill. When the system empties, the cold engine gets coolant poured in it. When the fluid is full in engine and you go to maintenance mode, the engine is ran at 2000 rpm and fan cycles 2 times and then the hot coolant then is allowed to transfer to the radiator and then you top off the coolant level and drive and top off again. Once you do the refill, before road test, you start the engine again and it resets out of maintenance mode.
 

ORVietVet

Well-Known Member
Navy Supporting Member
Joined
Dec 31, 2023
Messages
2,645
Reaction score
4,842
Location
Oregon
Ok, so yesterday I worked on a 2018 Toyota Camry XLE 2.5 Hybrid and dealt with a code P0128, to do with cooling system running to cold. Research points at the thermostat. Fans not involved because of the cooling running temps. I gotta tell ya, that thermostat/housing assembly, is a big PITA to get to.
Removed upper radiator cover, air snorkel, disconnected 8 different sensor connectors, including one on the thermostat housing. Then fold out of the way for access from above but that just means reach down and then curl the hands and fingers up to remove 2 8mm bolts and then the housing comes off. Reverse the procedure and then the fun begins.
Have to highest line on the cooling system and that is the EGR connector hose. Lay a cloth under it to catch coolant as it comes out during filling of coolant, after replacing the radiator drain plug. The refill is very slow going and filling the reservoir, too. You also have to burp the upper and lower radiator hoses. Fill very slow. The process takes about 30-40 minutes and then the coolant runs out at the disconnected EGR tube. Reconnect EGR line at the tube.
Then you start the engine and have to go thru 3-4 cycles to heat up engine and get it to open the thermostat and then top it all off again. Cleared code. Roadtested and monitored Live Data to watch the ECT sensor temps. All good and fans cycle as should. Codes all gone. See pics.

20260421_110509.jpg20260421_111912.jpg20260421_112606.jpg20260421_115204.jpg20260421_115226.jpg20260421_121636.jpg20260421_123347.jpg20260421_123359.jpg
 

ORVietVet

Well-Known Member
Navy Supporting Member
Joined
Dec 31, 2023
Messages
2,645
Reaction score
4,842
Location
Oregon
Ongoing 2 piece driveshaft problems on a neighbors 2003 Dodge Ram 2500 4x4 crew cab 5.7 gas engine. Not to long ago the carrier bearing came completely apart but the shop that did that work did not look too close at the u-joints. The center joint is trashed. Makes sense since that is the one right at the carrier bearing. Took the driveshaft assembly out after staking/indexing the joints. Driveline company doing all 3 joints tomorrow after I drop the assembly off at 8 a.m. My neighbor needs his truck. This is the same truck I put the steering linkage assembly in along with a shimmy shock. I had told him a while back that I could hear a U-joint squeak and he said the carrier bearing mechanic did not say anything so it must be good.

20260514_190314.jpg20260514_190208.jpg
 
Last edited:

ORVietVet

Well-Known Member
Navy Supporting Member
Joined
Dec 31, 2023
Messages
2,645
Reaction score
4,842
Location
Oregon
A local automotive instructor at a local junior/community college, has reached out to me about my tools. Apparently he heard of what my plans are for "full' retirement and selling my tools. I will have to ask how he "heard". Don't know what he has to say but am meeting him on Tuesday.
 

Latest posts

Members online

No members online now.
Top