2006 Silverado SS Intimidator resurrection

someotherguy

Well-Known Member
Joined
Feb 10, 2022
Messages
257
Reaction score
614
Location
Houston
I started this thread over on Chevytalk and the Silverado SS forums (which have now all but gone to sleep..) so let's wake up GMT800 forums with some historical, and current posts, about my 2006 Intimidator? Why not.. I may try to squeeze in some pics/details I left out of the original posts, too.

08-06-2015 Figured I'd start a post about my latest project.

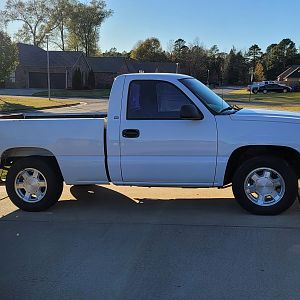
This is a 2006 Silverado Intimidator SS; 933 made for 2006 model year only (allegedly 1033 were supposed to be made but 100 were made as 2007 classic models, dunno about that.) It's a 2WD 1500 with the 345HP LQ9 6.0, 4L65E, 9.5" 14 bolt rear (the 2WD SS's got the 14 instead of the 10 bolt the earlier AWD models had) with 3.73 gears and the Eaton Gov-Loc unit, and chrome SS wheels instead of the usual silver.

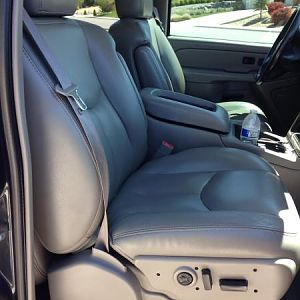
It's pretty well optioned-out with everything except the sunroof. The Intimidator package adds to a Silverado SS with the "Intimidator" script on the doors and tailgate, likeness of Dale Earnhardt's signature on the tach, and the Earnhardt Foundation logo embroidered on the front seat headrests. Also, a NASCAR-inspired wing is added to the bed.

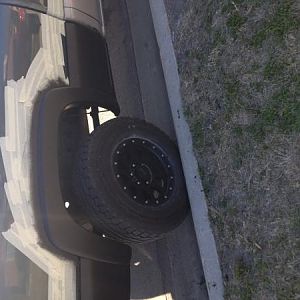
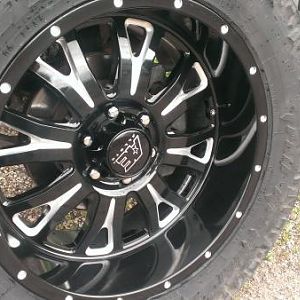
I picked this one up with 80K miles on it from the salvage auction. Hit in the right rear and totalled out for it, it appeared to me that it was an otherwise solid truck so I took a gamble and bought it.
06SS_001.jpg

06SS_002.jpg

06SS_003.jpg

06SS_004.jpg

Richard
 
Last edited:

someotherguy

Well-Known Member
Joined
Feb 10, 2022
Messages
257
Reaction score
614
Location
Houston
08-10-2015 picking it up in Shreveport LA after my winning bid. Engine runs great! Air is cold! Seats are good! All the power goodies seem to work. Truck is about 99% stock; just has a Pioneer touchscreen radio added, non-working HID headlights, some cheesy custom taillights (damaged anyway), and a Volant cold air intake kit.

06SS_015s.jpg

06SS_016s.jpg

06SS_017s.jpg

Amy's already asking if I'm gonna let her drive it.
biggrin.gif
Truck is still filthy and covered in auction marks...

06SS_020s.jpg

Richard
 
Last edited:

someotherguy

Well-Known Member
Joined
Feb 10, 2022
Messages
257
Reaction score
614
Location
Houston
08-18-2015 decided to try out the body shop that belongs to the company I work for. Was told I'd get the employee price, special treatment, blah blah blah. Explained to the guy I had already found sources for all the parts including the SS-specific items, just needed someone to do a good job on the repairs. They washed it up to get a good look at it, and started in with the markers...

06SS_026s.jpg

06SS_027s.jpg

And handed me an estimate for $7400 - of which $4400 was the parts list! $4400! I made sure I was squared up with them on the estimate and picked it up right away...no sense trying to debate pricing with these clowns.

Took it home, slapped the bent bumper back on it and tacked the damaged cover on to hide it. Installed some taillights to make it driveable and started making my next plans.

06SS_028s.jpg

09-04-2015 The headlights were fogged really bad and the park lamps weren't much better, so I grabbed some cheapo ebay style clear reflector versions (these didn't hold up well in the long run but were OK for a while)

06SS_029s.jpg

Richard
 
Last edited:

someotherguy

Well-Known Member
Joined
Feb 10, 2022
Messages
257
Reaction score
614
Location
Houston
09-08-2015 My dad offered to have his guys do the bodywork, but that means a trip out of state. I have faith his guys do good quality work, it's just a hassle to get the truck there. Seriously considering it though, so I start tending to the things the truck needs to make the trip.

Transmission had a real harsh 1-2 shift; was hoping it would just be a bad 1-2 accumulator spring or piston. Took it to my buddy Joe at Premier Transmission in Tomball - top notch guys; have been trusting Joe with my transmissions since literally the late 80's.

Turned out the spring wasn't broken but Joe felt it was too small. Replaced it with a heavier one, but not before pulling down the valve body to find the real problem - a check ball had worn through the separator plate. He fixed it all up and now I have nice, firm shifts - but no more crazy super hard parts-breaking 1-2.

06SS_030s.jpg

In the meantime I've been collecting parts for the repair. Have a brand new OEM GM outer/inner bedside, good used tailgate, OEM GM bed molding and tailgate molding, good used bumper, new tailgate emblems, and a few other items. I have basically everything on the body shop's parts list - for $1500 (including shipping!), not the $4400 they wanted!

09-20-2015 Now on to present day (today!) - new headlights and turn signals; old ones were badly hazed over and the headlight lenses beyond restoration - lots of tiny cracks in them. I also installed LED's for the other bulbs and 35W 5000K HID headlights.

06SS_033s.jpg

Installed the used rear bumper for now, and the old broken bedside corner molding, just to kind of hide the damage until the truck is repaired. Don't really want any nastygrams from the HOA for a "wrecked" truck in the driveway, plus I'm slightly less shamed to drive it around town now.
wink2.gif


06SS_035s.jpg

06SS_036s.jpg

Spent some time cleaning up the interior and I'm beat! Done for the day.

06SS_037s.jpg

Richard
 

someotherguy

Well-Known Member
Joined
Feb 10, 2022
Messages
257
Reaction score
614
Location
Houston
09-20-2015 Oh, and those tires in the background are a set of new Toyo Proxes ST2 265/40/22's - meant for the wheels you can also see next to the truck. Those are a set of GM "Transport" 22's that are all steel smoothies. They're meant just for transport of new high-end pickups, Escalades, etc. that have 22" wheels from the factory. They find their way into the market. These have been powdercoated gloss black, and look great, but I'm still not so sure I'm going to use them:

06SS_034s.jpg

So instead, I've ordered a set of 22" Dub Ballers with black hoops and the kind of smoke/tint colored spokes:

06SS_038s.jpg

Richard
 

someotherguy

Well-Known Member
Joined
Feb 10, 2022
Messages
257
Reaction score
614
Location
Houston
09-22-2015 A quickie wash only to find it's covered in a fine mist of overspray; looks like primer. I guess I can thank our bodyshop for that gift.
confused.gif
Oh well; still looks fairly good from this side.
wink2.gif


06SS_039s.jpg

10-20-2015 New shoes! I was planning on putting off install until after the body shop, but in the meantime I am driving the truck and the back tires were shot. Bald, dry rotted, rubber hardened up so much that even the slightest amount of pedal on a slick road sent the truck wiggling. So, some time in the driveway today netted this:

06SS_040s.jpg

06SS_041s.jpg

That fender gap with the slightly shorter tires should probably spur me on towards getting the drop done, too...I hope.

03-09-2016 got some aftermarket LED tailights (ran 'em for a while then removed..)

06SS_042s.jpg

Richard
 

someotherguy

Well-Known Member
Joined
Feb 10, 2022
Messages
257
Reaction score
614
Location
Houston
04-12-2016 Finally loaded her up and took to the body shop today! Getting the full deal. All damage to be repaired, complete paint job, all new emblems, etc. Guy does top notch work, just recently painted my little brother's '70 Chevelle, and a '69 Z/28 for a super picky friend of his.

I pulled all the unnecessary items from the truck and threw all the new parts inside, and headed out. Truck is in good hands and the results should be nothing less than awesome...can't wait!

06SS_043s.jpg

The big box in the back is the new GM bedside. I went OEM for everything I possibly could; about the only thing not GM is the smooth tailgate handle bezel (not available OEM afaik.)

04-15-2016 thru 04-22-2016 Updates from the body man!

Old bedside and taillight housing area chopped out

06SS_044s.jpg

New bedside in place (detail of new taillight housing area)

06SS_045s.jpg

Driver door handle opening minor re-work for Escalade handle (used a rear door handle w/o keyhole; required moving one tab)

06SS_048s.jpg

All dents repaired and worked areas primed

06SS_049s.jpg

(Nice shot of the whole new bedside!)

06SS_050s.jpg

This guy gets down...I only dropped the truck off just over a week ago!

06SS_051s.jpg

Richard
 
Last edited:

someotherguy

Well-Known Member
Joined
Feb 10, 2022
Messages
257
Reaction score
614
Location
Houston
05-13-2016 The suspense is killing me

06SS_056s.jpg

06SS_057s.jpg

05-17-2016 Don't want to get my hopes up without reason but I'm almost thinking I'll have my truck back by early next month. This guy is really kicking ass so I haven't bugged him one bit or asked for any kind of schedule. In the past I've had a truck and a bike in paint jail for what seemed like forever, and I've worked places where people's projects end up having birthdays at the shop...so I've seen the bad side of the business for sure.

06SS_058s.jpg

05-18-2016 All that shiny clear getting knocked down with 2000 grit before a good buffing out

06SS_059s.jpg

Richard
 

someotherguy

Well-Known Member
Joined
Feb 10, 2022
Messages
257
Reaction score
614
Location
Houston
05-23-2016 Bed and rear bumper cover painted, he says everything is painted now, just sanding/buffing and reassembly left!

06SS_060s.jpg

Some in-between pics at the painter's that originally got left out before I installed the small parts back on the truck to drive it home -

06SS_060as.jpg

06SS_060bs.jpg

06SS_060cs.jpg

06SS_060ds.jpg

05-31-2016 me and Aaron (the painter) getting ready to put the lamps back on it

06SS_061s.jpg

Richard
 

someotherguy

Well-Known Member
Joined
Feb 10, 2022
Messages
257
Reaction score
614
Location
Houston
05-31-2016 all back together!!!

06SS_060es.jpg

06SS_062s.jpg

06SS_063s.jpg

06SS_064s.jpg

A little ironic that the worst side, the crunched passenger bedside, came out crummy in the pic thanks to cloudy skies (I tried brightening up the original a little bit.) Oh well! Truck came out GREAT!

Richard
 

someotherguy

Well-Known Member
Joined
Feb 10, 2022
Messages
257
Reaction score
614
Location
Houston
10-11-2016 a little chop-chop at the muffler shop. When we got my wife's 2006 SS, her truck came with a Magnaflow muffler swapped into the factory exhaust. We keep opposite schedules since I work nights, so I didn't want her coming/going throughout the day to wake me up every time. So I got the loud exhaust, she got the stock setup.

06SS_065s.jpg

06SB_050s.jpg

10-25-2016 I swear my truck stays dirty...I drive it over to pick up the work truck and it sits in a dusty gravel lot with a bunch of other trucks driving past it all evening/night long. :( But today I put some new tires on, Toyo Proxes ST II just like before but a little taller and a little wider - 285/40/22 (what I shoulda bought in the first place when Tony told me that size), installed a new set of Gorilla locks in black instead of chrome to match the truck better, and some Bendix premium ceramic pads up front.

06SS_066s.jpg

11-16-2016 Now here she is all detailed up :) Wish I'd noticed when I took the pics there was a junky old Ford in the reflection.

06SS_067s.jpg

06SS_068s.jpg

06SS_069s.jpg

06SS_070s.jpg

Not bad for an old wrecked salvage title junker :D

Gonna have to seal up those park lamps though.

Richard
 

someotherguy

Well-Known Member
Joined
Feb 10, 2022
Messages
257
Reaction score
614
Location
Houston
02-22-2017 Aftermarket headlights and park lights went to shit in about a year, so I installed new GM pieces instead.

06SS_071s.jpg

06SS_072s.jpg

03-14-2017 In this pic hood is off and I'm getting ready to make the trip to the body shop to pick it up; painter doing a fix-up on it. Also had a new windshield installed while the hood was off.

06SS_073s.jpg

Hood back on, stopping at Louie Mueller BBQ in Taylor TX for a killer lunch before heading home!

06SS_074s.jpg

05-23-2017 just a beach pic ;)

06SS_074Bs.jpg

Richard
 

someotherguy

Well-Known Member
Joined
Feb 10, 2022
Messages
257
Reaction score
614
Location
Houston
06-13-2017 and now swapped to some Centerline Stingray 22's and Nitto 421Q in 285/45/22 - tires are basically new, wheels are used but in really sweet shape. craigslist special (I had ordered some new Centerline Smoothies in 22" but it was right at the time Centerline was circling the drain - double the wait time and they just kept giving me excuses, so I battled them for a refund, then they promptly went out of business and licensed the name to a new company)

06SS_075s.jpg

06SS_076s.jpg

10-11-2017 So a year ago (literally to the day) I had both SS's at the muffler shop swapping out the systems between the trucks because the silver birch SS had a Magnaflow muffler installed on the otherwise stock setup, since my wife was going to drive it we put the stock muffler setup on it and the Magnaflow on mine.

Fast forward a year to today, didn't care much personally for the Magnaflow so I took time out to install the Corsa cat-back that I got in trade from a Silverado SS forum member -

New old stock still in the Corsa/GM boxes:

06SS_077s.jpg

Old system out with just one chop from the Sawz-all:

06SS_078s.jpg

New system in place, fit was pretty good other than the part for the middle hanger was really way off, seems to be holding up fine though:

06SS_079s.jpg

youtube video here of the first fire-up:


Richard
 

someotherguy

Well-Known Member
Joined
Feb 10, 2022
Messages
257
Reaction score
614
Location
Houston
11-22-2017 A little while back began getting the TIGHTEN FUEL CAP error on the driver display. Code check showed P0442 small evap leak; further driving resulted in P0455 gross evap leak. Began having trouble filling the tank as the pump would constantly click off even at the slowest setting. About 90K miles on the truck.

When it was just P0442 first hope was just needing a gas cap, since the one I had was an aftermarket locking cap with a very cracked O-ring seal. Installed new AC Delco # GT225 (GM # 15763225) a little different from original, doesn't have a "line" style tether on it but surround-style, but it's OEM and works fine. Cleared code and it came back, not really a surprise.

Next up, ordered AC Delco # 214-2082 (GM # 19207763) revised canister purge valve assembly. There are 2 different part #'s depending on your year model of GMT800 truck so look it up before ordering. This is the revision where the filter is separate so it can be remote mounted.

Old purge valve/filter assembly removed. Take care removing the clip from the white plastic connector to the canister; fingernail or a small screwdriver to gently push the tabs loose and slide the clip out - you're re-using the white plastic piece, which requires carefully cutting the plastic hose off with a utility knife, small side cutters, etc. I also used needle nose to help peel the hose off.

06SS_081s.jpg

Purchased 12' of 1/2" hose, need about 16" of it to attach new purge valve to the canister, the rest of it to remote mount the filter towards the front of the truck. This is enough for my 2006 extended cab with purge valve at rear of tank and my chosen place to mount the filter by the transmission; measure your own installation to be sure.

06SS_082s.jpg

New purge valve in place and connected, and found it easier to feed the hose from the large hole in the frame ahead of the tank and push towards the rear, then route the rest along the frame above the fuel line clamps and ABS module bracket.

06SS_083s.jpg

Mounted remote filter above transmission tailshaft housing, zip-tied to the transmission vent hose, not too tight so the hose doesn't get pinched.

06SS_084s.jpg

Cleared codes using Torque Pro, BAFX Products bluetooth OBD2 adapter, and my trusty BlackBerry Passport SE.
smile1.gif


06SS_085s.jpg

Post-mortem on the old filter showed a little bit of dust, not a ton of it, so I'm hoping my canister is still good. Some driving when I return to work Friday should show whether the codes come back, if they do, I'll do the canister next.

Richard
 

someotherguy

Well-Known Member
Joined
Feb 10, 2022
Messages
257
Reaction score
614
Location
Houston
03-16-2018 Ever had one of those Fridays where adding beer to it would NOT help? The struggle is real

06SS_086s.jpg

All 8 bulbs replaced, about 5 bucks and an hour's work. Or spend 120ish on new switches. Hmmm
1f600.png


Upper switches pretty easy. lower ones tricky to remove and worse to re-install due to wires being very short, a 90 degree pick helped to pull the connector up and seat it. bulbs you can get from amazon cheap. took maybe an hour total for the steering wheel. search CEC Industries 7219 Bulbs, 12 V, 0.72 W, Wire Terminal Base, T-1 shape

06SS_087s.jpg

10 more bulbs, 2 more hours, and about 506 junebugs flying into the garage.. the gauge cluster and a/c panel are done too. With enough time for me to hit the stripes for a 6 of negra modelo
1f601.png


06SS_088s.jpg

04-18-2018 Might as well...uneven lighting was bugging me so they all got replaced, as well as the other 6 stepper motors to avoid gauge issues later. Another Silveraydo cluster repaired (fuel gauge stepper quit after a battery swap)

06SS_089s.jpg

Richard
 

someotherguy

Well-Known Member
Joined
Feb 10, 2022
Messages
257
Reaction score
614
Location
Houston
06-06-2018 the "GM Genuine" headlights I bought just a year ago are already peeling on the clearcoat. The driver side pictured here is a warranty unit that I had swapped out because when I tried to adjust the previous one, the head on the adjuster screw shattered. Folks don't waste your money; GM has these made in China now and you spend practically 3x the price of decent aftermarket (TYC)

06SS_090s.jpg

06-10-2018 So this happened today, on way home and A/C chucked the belt. Was cooling fine but making a noise; may just be the tensioner which the compressor has its own along with its own belt. Not fun being a black truck in Texas summer with no A/C so it looks like the 300 will be my daily til I get a chance to mess with this...

06SS_091s.jpg

06-13-2018 new GMT900-style stretch belt installed, 2nd tensioner deleted

06SS_092s.jpg

Part # for the belt.. and don't bother with that Gates stretch-belt installation tool; didn't work for me as it wouldn't fit over the crank pulley. I got the job done easily by using zip ties to secure the belt to the pulley, worked it around til it slipped on, then cut them off.

06SS_093s.jpg

A quick edit trying to keep stuff in chronological order-

10-05-2018 Starter began crapping out, then quit entirely - a day before UPS showed up with my new one. Had to drive the work truck home. Head in next day with new starter and tools ready to swap it at end of my shift. Few hours into my shift, bossman tells me, "your truck is fixed." Huh? He had picked up a new starter and had our mechanic swap it. Now I've got a spare starter to put on the shelf, and a bunch of hassle saved. Can ya beat that?

06SS_94s.jpg

Richard
 
Last edited:

someotherguy

Well-Known Member
Joined
Feb 10, 2022
Messages
257
Reaction score
614
Location
Houston
12-08-2018 picked up some OEM Silverado foglamps and switch since the SS has the harness already in place, figured it'd be a simple upgrade. Had to make some brackets to get them positioned behind the brake ducts, though. Just used some flat stock from the box store and made mock-up patterns out of cardboard strips.

06SS_094s.jpg

06SS_095s.jpg

06SS_096s.jpg

06SS_097s.jpg

Richard
 

someotherguy

Well-Known Member
Joined
Feb 10, 2022
Messages
257
Reaction score
614
Location
Houston
Vehicles out of the way of any overspray, brackets hung from garage door with baling wire I saved to hold pushrod tubes up on Harley shovelheads to adjust the valves.. gonna take forever to dry in this weather, probably reassemble tomorrow.

06SS_098s.jpg

12-10-2018 Installed LED bulbs to match the HID headlight color a little better

06SS_099s.jpg

And some LED DRL bulbs as well

06SS_100s.jpg

Richard
 

someotherguy

Well-Known Member
Joined
Feb 10, 2022
Messages
257
Reaction score
614
Location
Houston
12-18-2018 Discovered my Intimidator has a really bad upper ball joint; the boot tore and the joint went to hell. Lots of slack in it. The rest of the suspension is in good shape, just failure of this joint because the boot. Ordered a pair of Moog Problem Solver K6540 from Amazon, ended up a few bucks less than buying just ONE locally.

The Enchanted Garden brand or whatever Chinese thing the O'Reilly's had in their loaner tool program was just enough to get it done. Problem is nobody cared enough to ever grease the thing before using it so the ball bearing inside the screw insert was egg-shaped and pitted and the thing barely spun although I greased the crap out of it and the screw. I fought that tool for all it was worth to get these joints done.

Since the only joint showing any issue was the passenger upper because the boot tore wide open, I wasn't planning on doing any other parts. Testing showed the driver side joints had zero slack. I ended up replacing the driver side upper anyway though because its boot was torn enough that it was oozing grease all around, and I had the parts and tool in hand, so they both got done.

Didn't want to do full disassembly since other parts were fine, so I used my floor jack to support the LCA, left a gap, and tapped the spindle around the upper ball joint area letting the force of the torsion bar pop it loose. (Left the nut threaded on a bit so it couldn't go crazy.) Strap holding the spindle/caliper in place so it couldn't fall slack and put stress on the brake hose.

06SS_102s.jpg

Using the ratchet I just barely got it to crack the joint a little amount. Gave me room to squirt some PB Blaster in there and let it soak a bit, then I switched to a breaker bar instead.

06SS_103s.jpg

Moog Problem Solver K6540 going in, lubed the splines and hole in the UCA to help, be sure to align the dot facing the wheel.

06SS_106s.jpg

Installed, reassembled, greased...

06SS_107s.jpg

Driver side was a real pain in the ass, mostly I blame the tool for not allowing the cap to spin on its bearing. Had to make a cheater pipe out of a floor jack handle, but got it done. Another tip, using a ratchet strap under the LCA, hooked to the UCA to pull it down, kept it from moving while reefing on the press tool. Made it go better for sure.

06SS_110s.jpg

Richard
 

Latest posts

Members online

Top