You are using an out of date browser. It may not display this or other websites correctly.
You should upgrade or use an alternative browser.
You should upgrade or use an alternative browser.
My first GMT800, 01 2500HD LQ4
- Thread starter CPB
- Start date


If you do replace the harness, with a quality replacement, like you should and is recommended by oh so many people, you will not have to CHECK IT, except for anything that could have damaged the old harness.Started getting P0332 (comes back after reset), so ordered all the parts to replace the knock sensors. I'll also check the condition of the wiring while I'm under there.
So it was a slightly different failure mode than I anticipated. The rear knock sensor valley was filling slowly with coolant once I disassembled. So had to do some parts runs for more gaskets during the job.


I also installed the updated valve cover that's supposed to have better baffling for the PCV. It didn't have a grommet for the PCV on the VC, so just adapted an OEM one with some adapters I had laying around.


No photo of the terrible RTV dam I did based on the GM TSB.
I also installed the updated valve cover that's supposed to have better baffling for the PCV. It didn't have a grommet for the PCV on the VC, so just adapted an OEM one with some adapters I had laying around.
No photo of the terrible RTV dam I did based on the GM TSB.
AuroraGirl
Well-Known Member
What do you mean by the grommetSo it was a slightly different failure mode than I anticipated. The rear knock sensor valley was filling slowly with coolant once I disassembled. So had to do some parts runs for more gaskets during the job.
View attachment 4518
I also installed the updated valve cover that's supposed to have better baffling for the PCV. It didn't have a grommet for the PCV on the VC, so just adapted an OEM one with some adapters I had laying around.
No photo of the terrible RTV dam I did based on the GM TSB.
The updated valve cover has a permanent PCV installed into it, that is non serviceable but its an orifice. a spray of carb clean is the only service, or a poke with a wire.
The intake should have a vacuum port that you connect to it like OEM. Was it a dorman one?
If you have a open hole that fits a PCV , you need a 2003 orifice PCV valve, that should be pressed in like an interference fit or stiffly into a grommet, which i suspect your cover is like.
If it has a nipple on the valve cover , its the pcv
AuroraGirl
Well-Known Member
well it can, you just only make sure its not blocked, but with no rattling/spring valve in it , its just a in-out make sure its clean and clear. so less involvedI don't really trust one that can't be serviced.
id still like to know the answers to my questions if you can, im not trying to control your actions id like just to know what is what and helping ensure you dont have 2 pcv in a row etc
I'm sticking with my solution. I appreciate the concern though.well it can, you just only make sure its not blocked, but with no rattling/spring valve in it , its just a in-out make sure its clean and clear. so less involved
id still like to know the answers to my questions if you can, im not trying to control your actions id like just to know what is what and helping ensure you dont have 2 pcv in a row etc
AuroraGirl
Well-Known Member
can i at least have clarifications on what exactly you did? a the questions i asked were becuase im not sure how youre piece you created fits in the picture of , maybe some final install pics and just describing what all is doneI'm sticking with my solution. I appreciate the concern though.
was the valve cover from GM or dorman or other source?
AuroraGirl
Well-Known Member
yes his last sentence he said he didnt include a photo of his RTV "dam" per the TSBDid you use sealer on the knock sensor harness rubber plug in boots? The last pic posted shows the harnesses plugged in and is nice and clean but I see no sealer.
That's what I get for only reading before the pics.yes his last sentence he said he didnt include a photo of his RTV "dam" per the TSB

Just wrapped up doing about 2k miles of towing for the latest race. The bearing inside the 105A alternator is starting to make a serious groan, so ordered the ACDelco Gold #88864277 replacement that's listed as 130A. Figured that would give a little more buffer if I move to electric radiator fans.
$129.99 + $35 core fee.
AuroraGirl
Well-Known Member
Remember you need a new beltView attachment 4936
Just wrapped up doing about 2k miles of towing for the latest race. The bearing inside the 105A alternator is starting to make a serious groan, so ordered the ACDelco Gold #88864277 replacement that's listed as 130A. Figured that would give a little more buffer if I move to electric radiator fans.
$129.99 + $35 core fee.

"It's not stupid if it works"
Added a Dorman 800-196 check valve to the supply line for the fuel rail.
-Dorman 800-196
-Female 3/8" Fuel Line Quick Connect Adapters to 3/8" barb (https://www.amazon.com/dp/B0B8ZWGBYS)
-Male 3/8" Fuel Line Quick Connect to 3/8" barb (https://www.amazon.com/dp/B0DS2CW41T)
-3/8" EFI Fuel hose
I don't love the Dorman, since it uses nylon fittings for a compression fit to adapt the 3/8" barbs. Seems like a leak potential. I did a loop to take strain off the system, and also allow me to just add a new section of line without chopping into the factory system. It's easily reversed this way if I want to try a different check valve or if I ever replace the fuel pump.
INW-Iron-Steel
Well-Known Member
Nice truck and cool thread! I see you're using the "beefy" Dorman RD stuff. I'm not typically a fan of Dorman, but the marketing got me. And, I gotta say, I've been impressed. The Dorman stuff has lasted at least as long as the Moog stuff I took out.View attachment 3626
Installed new endlinks, UCA and LCA ball joints. The original ones were very stuck. It was tempting to just replace the entire control arm.
I usually heat the arm (or component, whatever you're working on) evenly with medium heat until the bushing starts to smoke. Then I briefly aim the heat at both ends of the rubber bushing to really get them burning. I little 'pop' from a screwdriver and the bushing falls out.When they "burn" them out, they are just melting the rubber bushing and then the inner sleeve falls out and the outer sleeve is easier to "coax" to fold inward to make it easier to remove....or press out.
I really like polyurethane bushings because you often don't have to coax that outer sleeve out. Just clean up the sleeve and push poly bushings in. At least that's how I justify the price of poly bushings...

Tried this a few weeks ago. That's a broken extractor.
Took it to a local exhaust shop and they said, "You can't get those out!"
I nodded in obvious agreement gesturing towards the broken extractor. They pointed me towards someone that could weld on the cast iron, since my goal was just a block off. That ended up as a dead end. Fortunately these manifolds are $110 brand new from any parts store. Bought and installed a dorman exhaust manifold and called it a day.
The intake ports and valves were very grimy when I had the intake manifold off for knock sensor replacement. I could visually see where the injectors were doing some cleaning, but the engine was still crapping in it's mouth due to EGR. Now that it's deleted I'll revisit walnut blasting the ports/valves.
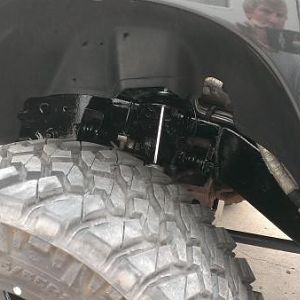
I'm not sponsored by Dorman, but maybe I should be. The right rear exhaust manifold bolt had long broken off in the head prior to my ownership. It's a common problem due to thermal cycling, mixed expansion rates of these three materials and the crappy GM fasteners.
Installed this bracket to solve the minor leak without pulling the heads to extract the bolt. Dorman 917-142

Installed this bracket to solve the minor leak without pulling the heads to extract the bolt. Dorman 917-142
Yes, the right rear also is for the left front. The right front is also for the left rear. 2 part numbers cover all 4 corners. I have them on my 2005 Tahoe.I'm not sponsored by Dorman, but maybe I should be. The right rear exhaust manifold bolt had long broken off in the head prior to my ownership. It's a common problem due to thermal cycling, mixed expansion rates of these three materials and the crappy GM fasteners.
Installed this bracket to solve the minor leak without pulling the heads to extract the bolt. Dorman 917-142
View attachment 5885
AuroraGirl
Well-Known Member
is the passenger side exhaust manifold supposed to be split in 2 pieces in the center?Yes, the right rear also is for the left front. The right front is also for the left rear. 2 part numbers cover all 4 corners. I have them on my 2005 Tahoe.
Similar threads
- Replies
- 21
- Views
- 906
- Replies
- 12
- Views
- 811
- Replies
- 29
- Views
- 2K