Good call.View attachment 2686
evidence of loose fitting splines into the wheel bearing, they look worn
make sure you never use impact on CV axle nut , and you make sure its torqued. Usually need to put a prybar or large screwdriver into the rotor with the brakes on so you can prevent rotation
You are using an out of date browser. It may not display this or other websites correctly.
You should upgrade or use an alternative browser.
You should upgrade or use an alternative browser.
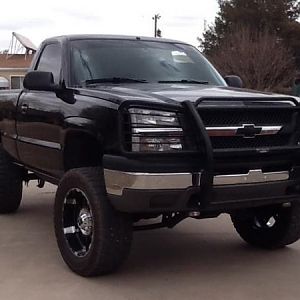
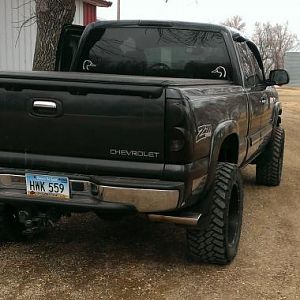
New to Me GMT800? (Edit: Our New Yukon)
- Thread starter Cadillacmak
- Start date
AuroraGirl
Well-Known Member
Here is today's progress. Hub assemblies, outer tie rod ends and upper A-arms replaced. Now its wait on parts for the next session.
View attachment 2678View attachment 2679View attachment 2680View attachment 2681View attachment 2682View attachment 2683View attachment 2684
I also dont see ANY lubricant on these brakes

These are 3/4 ton but the reason I post is to show you the purple and orange. They are my choice of lubricant. A silicone based brake grease for the slide pins (necessary for the rubber parts)
The purple is a petrolum based ceramic brake lube, better for washout resistance and corrosion prevention and not picking up debris
You want to lube the slides the pads ride in, you want to lube the pins that slide the caliper, you want to lube the spots on the back of the pad that touch the piston (i use the silicone based kind for this spot because the dust seal on the pistons, dont want to ruin it), then lube where the outer part of the caliper holds onto the outboard pad.

The ones for the front are actually getting rare to find.. id suggest getting them.. reusable with more brake jobs in the future...
Brake Drag Reduction Clip Raybestos H6009

Brake Drag Reduction Clip Raybestos H6009 | eBay
Part #: H6009. Because brakes are the most vital?. system to the safety of a vehicle- manufacturers of the Raybestos?. For more than 100 years- Raybestos?. The Raybestos?.
www.ebay.com
This is from a honda with the same shape generally for the rear:

Cadillacmak
Well-Known Member
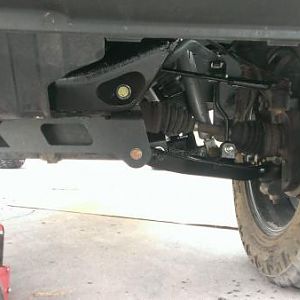
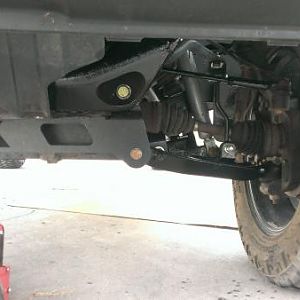
The axle nut was not torqued when I went to take it off! Came off REAL easy. Shops around here are horrible, I know that Gary always took this truck to shops and this is the crap they did. Pisses me off, Gary served as a police officer and his wife was a local family doctor, and they this is how a family of service gets treated when taking their truck to the shop.View attachment 2686
evidence of loose fitting splines into the wheel bearing, they look worn
make sure you never use impact on CV axle nut , and you make sure its torqued. Usually need to put a prybar or large screwdriver into the rotor with the brakes on so you can prevent rotation
Cadillacmak
Well-Known Member
Thank you again! I think everything I have learn in this life was from a Vietnam vet.Yea, upper and lower control arms need to be tightened/torqued while in the loaded position. Down on ground. You can snug them up but final tighten is on ground. Otherwise the rubber bushings will be loaded wrong and can cause handling problems and tear.
Cadillacmak
Well-Known Member
Thank you, I will address this when the shocks come in, if they will ever ship.I also dont see ANY lubricant on these brakes
You should also pay attention to @AuroraGirl too. Better eyes than me. Yea, there is a torque spec for that axle nut, too. When I first started in shops 40 years ago, I was making mistakes too. I had a guy that was ancient in my eyes, but he taught me the value of torque specs and hated the phrase, "That's good enough".Thank you again! I think everything I have learn in this life was from a Vietnam vet.
Use the recommended brake lube and always new hardware. Lots of heat built up from brakes.
AuroraGirl
Well-Known Member
.JPEG")
My control arms and bushings are old and tired but i got original shocks for my truck. MUCH better riding and my rear ones are still bad lol
Cadillacmak
Well-Known Member
Rock Auto Rocks!Rock Auto order came in today, missing parts! I am guessing they are laying around a UPS truck or warehouse by the look of things. Filled a claim with both UPS and Rock Auto, but that doesn't help me fix the Yukon!

Cadillacmak
Well-Known Member
Starting this tomorrow night, pending life. Nothing needed here, just all wants and wishes.

stutaeng
Well-Known Member
Christmas in April! ")
someotherguy
Well-Known Member
He's 100% correct on tightening, and torquing the control arms at ride height position. What I never thought of, but learned over on the gmt400 forum (from Schurkey) is that it's OK to ignore that warning if you're using the polyurethane bushings, and it makes total sense. The rubber bushings are bonded to the metal shell. Polyurethane are not.Thank you again! I think everything I have learn in this life was from a Vietnam vet.
Unrelated but back to your to-do list, absolutely do not fear recovering the lower seat cushions. Probably the easiest seat work to do. My only advice is to be super super careful working with it as the edges of the sheetmetal seat frame are VERY VERY SHARP. You will cut yourself. Just take care to not cut yourself too badly.
Oh, and if you have power seats, don't cut the hole in the cover to the size of the panel. Cut just the smallest necessary opening, because the aftermarket cover won't have the stiffening plastic rail sewn inside that catches around the edge of the seat frame. Look at your old cover in that area when you remove it and you'll see exactly what I mean.
Richard
Cadillacmak
Well-Known Member
Thanks, I need to search those up and get them ordered!Unrelated but back to your to-do list, absolutely do not fear recovering the lower seat cushions. Probably the easiest seat work to do. My only advice is to be super super careful working with it as the edges of the sheetmetal seat frame are VERY VERY SHARP. You will cut yourself. Just take care to not cut yourself too badly.
Cadillacmak
Well-Known Member
Didn't get much done on the Yukon, its breakup here so we did a bunch of other things. Pumped yard water, got the Vette out of the garage and checked out for the season. Some garage cleaning, etc. But I did get the CB installed. Need to wash and detail the Yukon soon since its getting nice.

AuroraGirl
Well-Known Member
how do you remove the cushion or is it done in position? I want to put a leather cover instead of my cloth oneHe's 100% correct on tightening, and torquing the control arms at ride height position. What I never thought of, but learned over on the gmt400 forum (from Schurkey) is that it's OK to ignore that warning if you're using the polyurethane bushings, and it makes total sense. The rubber bushings are bonded to the metal shell. Polyurethane are not.
Unrelated but back to your to-do list, absolutely do not fear recovering the lower seat cushions. Probably the easiest seat work to do. My only advice is to be super super careful working with it as the edges of the sheetmetal seat frame are VERY VERY SHARP. You will cut yourself. Just take care to not cut yourself too badly.
Oh, and if you have power seats, don't cut the hole in the cover to the size of the panel. Cut just the smallest necessary opening, because the aftermarket cover won't have the stiffening plastic rail sewn inside that catches around the edge of the seat frame. Look at your old cover in that area when you remove it and you'll see exactly what I mean.
Richard
I got a color matched leather one, it has plastic clips that are around the edges that are wide and short so i assume they are holding onto something
someotherguy
Well-Known Member
Seat out of the truck and separate the back and cushion. Pretty easy. A few details and pics from this post in my '06 SS thread -> https://www.gmt800.com/threads/2006-silverado-ss-intimidator-resurrection.8985/page-2#post-20482how do you remove the cushion or is it done in position? I want to put a leather cover instead of my cloth one
I got a color matched leather one, it has plastic clips that are around the edges that are wide and short so i assume they are holding onto something
Richard
The seat removal is pretty easy. Tilt the steering wheel up, remove the two front torx nuts and the two rear bolts. I then just tilted the seat back and the harness connectors were completely exposed. Disconnected and lifted seat out. I did this recently on a 2005 Tahoe LS.Seat out of the truck and separate the back and cushion. Pretty easy. A few details and pics from this post in my '06 SS thread -> https://www.gmt800.com/threads/2006-silverado-ss-intimidator-resurrection.8985/page-2#post-20482
Richard
Cadillacmak
Well-Known Member
Not much getting complete on the Yukon, to much life getting in the way.To do list:
1. Check engine light investigation and repairs
2. Check and change all fluids
3. Repair sunroof motor
4. Install missing fog lights
5. Clean
6. Recover front seat bottoms
7. Install radio/NAV/DVD and backup camera
8. Install CB
9. New rims
10. Misc repairs
1. Complete, it was a missfire code that went away with the coils, wires, plugs tuneup.
2. All fluids checked and good, still to do an oil change and trans service before it hits the road full time.
3. Still need to investigate sunroof repair.
4. Need to reorder.
5. Still need to clean, its almost nice enough outside.
6. Need to order.
7. Still needs done.
8. CB and PA horn installed!
9. Maybe future.
10. Number 3 should have been a once over on the whole truck, because that is what my son and I did. Found a bad alternator bearing and bad front wheel hub assemblies. Replaced alt, ordered ball joints, hubs, tie rod ends, and front shocks. Still need to do lowers when I can find time, holding off on shocks for now as they are still good.
Cadillacmak
Well-Known Member
I got one door done tonight! New speakers installed, door sound deadening done, and door detailed. Installed missing screw clip while there. Door handle trim was installed, not sure why I took the pic before and not after.


Cadillacmak
Well-Known Member
One more door done. Installed the Alpine S2-S65C in the front and rear. https://www.crutchfield.com/p_500S2S65C/Alpine-S2-S65C.html The wiring adapter is perfect, the mounting adapter is garbage and you need to modify the front and not needed in the rear. Just unscrew the speaker and using smaller head screws, reinstall (rear). Drilled a 2 inch hole in the door panel behind the grill under the main speaker for the rear tweeter. It doesn't show up in the picture but its 2 inches on center below the bottom of the woofer.


Last edited:
Cadillacmak
Well-Known Member
The stereo is installed. Its a navigation, DVD, radio, bluetooth, USB, 3 camera, hands free... etc head unit.


Similar threads
- Replies
- 156
- Views
- 9K
- Replies
- 29
- Views
- 2K